体验docker+mesos+marathon
本文接上篇《在docker中安装php运行环境》,为了将docker集群化部署需要用到开源PAAS项目marathon,而marathon是基于开源分布式资源管理框架mesos实现的。
下面会记录我的实践过程,除了基本的部署外,会额外记录一下关键知识点的分析,希望帮助更多朋友来快速理解整套系统。
在你按照我的博客部署环境的过程中要注意如下几点,以便减少你遇到问题的可能性:
- 严格按照次序执行命令
- 不要无脑执行命令,理解每个步骤的用意
- 关注外链里的内容是否与本博客一致,因为官方文档随时在更新,而我的博客并不会。
安装centos7虚拟机
毋庸置疑,服务器一般都是centos操作系统,所以我们要先虚拟一个环境出来。
下载centos7 minimal最小化版本(600M+)
下载地址:https://www.centos.org/download/,选择minimal完成下载。
下载virtualbox虚拟机
下载地址:https://www.virtualbox.org/wiki/Downloads,选择适合自己操作系统的下载。
将centos7安装到virtualbox
安装时记得将磁盘大小调整为20G,因为编译mesos会下载很多的依赖库,虚拟机默认8G完全不够。
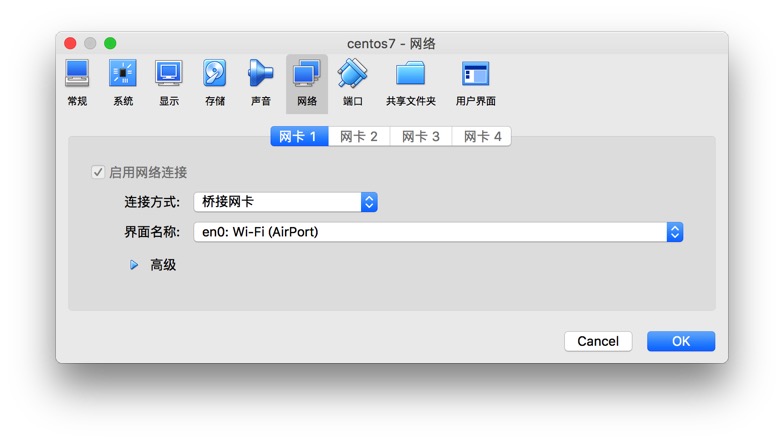
修改虚拟机网络模式为桥接
这样虚拟机可以分配到物理局域网的真实IP地址,宿主机和虚拟机也可以互相访问
初始化centos7
因为minimal版本自带的工具很少,所以需要安装一下。
关闭防火墙
如果不关闭,后面docker容器做端口映射就会失败。
|
1 2 |
systemctl stop firewalld.service #停止firewall systemctl disable firewalld.service #禁止firewall开机启动 |
配置网卡
minimal默认网卡不会开机启动,因此无法上网,需要改一下配置把网络拉起来,参考:http://blog.csdn.net/think_ycx/article/details/50240757。
替换国内YUM源
国外的太慢,换成国内的,这是可选的一步,参考:http://mirrors.163.com/.help/centos.html。
更新YUM源
|
1 |
yum update -y |
安装ifconfig
minimal没有这个命令,我们要用它看虚拟机的IP地址,安装一下:
|
1 |
yum install net-tools |
安装killall
minimal没有这个命令,安装一下:
|
1 |
yum install psmisc |
安装vim
|
1 |
yum install vim |
安装docker
一键安装
从daocloud上下载安装脚本,一键完成安装。
|
1 |
curl -sSL https://get.daocloud.io/docker | sh |
镜像加速
国外的docker hub镜像被墙的痛不欲生,配置一下使用daocloud镜像加速器,参考这里:https://www.daocloud.io/mirror#accelerator-doc。
开机启动docker
第一个命令是开机启动,第二个是立即启动。
|
1 2 |
systemctl enable docker systemctl start docker |
确认docker正常
运行docker ps,docker images,可以正常访问即可。
安装zookeeper
mesos和marathon都使用zookeeper选主,我们在虚拟机里模拟部署一个3实例的zk集群。
官方文档可以参考:https://zookeeper.apache.org/doc/r3.4.9/zookeeperStarted.html,我的部署安装如下:
拷贝3份zk
|
1 2 3 4 5 6 7 8 |
[root@localhost zookeeper]# pwd /root/zookeeper [root@localhost zookeeper]# ll 总用量 68 -rwxr--r--. 1 root root 160 2月 5 07:13 start_all.sh drwxr-xr-x. 11 root root 4096 2月 5 05:18 zookeeper1 drwxr-xr-x. 11 root root 4096 2月 5 05:21 zookeeper2 drwxr-xr-x. 11 root root 4096 2月 5 05:21 zookeeper3 |
修改3份zoo.cfg配置
|
1 2 3 4 5 6 7 8 9 10 11 12 13 14 15 16 17 18 19 20 21 22 23 24 25 26 27 28 29 30 31 32 |
[root@localhost zookeeper]# cat zookeeper1/conf/zoo.cfg # The number of milliseconds of each tick tickTime=2000 # The number of ticks that the initial # synchronization phase can take initLimit=10 # The number of ticks that can pass between # sending a request and getting an acknowledgement syncLimit=5 # the directory where the snapshot is stored. # do not use /tmp for storage, /tmp here is just # example sakes. dataDir=/root/zookeeper/zookeeper1/data # the port at which the clients will connect clientPort=2181 # the maximum number of client connections. # increase this if you need to handle more clients #maxClientCnxns=60 # # Be sure to read the maintenance section of the # administrator guide before turning on autopurge. # # http://zookeeper.apache.org/doc/current/zookeeperAdmin.html#sc_maintenance # # The number of snapshots to retain in dataDir #autopurge.snapRetainCount=3 # Purge task interval in hours # Set to "0" to disable auto purge feature #autopurge.purgeInterval=1 server.1=localhost:2888:3888 server.2=localhost:2889:3889 server.3=localhost:2890:3890 |
|
1 2 3 4 5 6 7 8 9 10 11 12 13 14 15 16 17 18 19 20 21 22 23 24 25 26 27 28 29 30 31 32 |
[root@localhost zookeeper]# cat zookeeper2/conf/zoo.cfg # The number of milliseconds of each tick tickTime=2000 # The number of ticks that the initial # synchronization phase can take initLimit=10 # The number of ticks that can pass between # sending a request and getting an acknowledgement syncLimit=5 # the directory where the snapshot is stored. # do not use /tmp for storage, /tmp here is just # example sakes. dataDir=/root/zookeeper/zookeeper2/data # the port at which the clients will connect clientPort=2182 # the maximum number of client connections. # increase this if you need to handle more clients #maxClientCnxns=60 # # Be sure to read the maintenance section of the # administrator guide before turning on autopurge. # # http://zookeeper.apache.org/doc/current/zookeeperAdmin.html#sc_maintenance # # The number of snapshots to retain in dataDir #autopurge.snapRetainCount=3 # Purge task interval in hours # Set to "0" to disable auto purge feature #autopurge.purgeInterval=1 server.1=localhost:2888:3888 server.2=localhost:2889:3889 server.3=localhost:2890:3890 |
|
1 2 3 4 5 6 7 8 9 10 11 12 13 14 15 16 17 18 19 20 21 22 23 24 25 26 27 28 29 30 31 32 |
[root@localhost zookeeper]# cat zookeeper3/conf/zoo.cfg # The number of milliseconds of each tick tickTime=2000 # The number of ticks that the initial # synchronization phase can take initLimit=10 # The number of ticks that can pass between # sending a request and getting an acknowledgement syncLimit=5 # the directory where the snapshot is stored. # do not use /tmp for storage, /tmp here is just # example sakes. dataDir=/root/zookeeper/zookeeper3/data # the port at which the clients will connect clientPort=2183 # the maximum number of client connections. # increase this if you need to handle more clients #maxClientCnxns=60 # # Be sure to read the maintenance section of the # administrator guide before turning on autopurge. # # http://zookeeper.apache.org/doc/current/zookeeperAdmin.html#sc_maintenance # # The number of snapshots to retain in dataDir #autopurge.snapRetainCount=3 # Purge task interval in hours # Set to "0" to disable auto purge feature #autopurge.purgeInterval=1 server.1=localhost:2888:3888 server.2=localhost:2889:3889 server.3=localhost:2890:3890 |
三个配置都拷贝自conf/zoo_sample.cfg,主要修改:
- dataDir用来分别存储各自的数据
- clientPort用来分别响应客户端的连接(因为3个zk都部署在一个虚拟机内,所以要区分一下端口)
- server.x来定义zk集群的3个实例的id和通讯端口
配置3份myid
用于告知每个zk实例自己的ID
|
1 2 3 4 5 6 |
[root@localhost zookeeper]# cat zookeeper1/data/myid 1 [root@localhost zookeeper]# cat zookeeper2/data/myid 2 [root@localhost zookeeper]# cat zookeeper3/data/myid 3 |
配置启动脚本
|
1 2 3 4 5 6 |
[root@localhost zookeeper]# cat start_all.sh #!/bin/bash /root/zookeeper/zookeeper1/bin/zkServer.sh start /root/zookeeper/zookeeper2/bin/zkServer.sh start /root/zookeeper/zookeeper3/bin/zkServer.sh start |
启动zookeeper
|
1 |
sh start_all.sh |
验证zookeeper
进入zookeeper1目录,执行zkCli.sh看看是否可以访问成功:
|
1 2 3 4 |
[root@localhost zookeeper1]# bin/zkCli.sh .... [zk: localhost:2181(CONNECTED) 0] ls / [zookeeper] |
安装mesos
安装依赖
参考https://mesos.apache.org/gettingstarted/中的CentOS 7.1部分,逐条执行即可,你将会体会到替换yum源是多么的有先见之明。
替换maven源
maven的配置在/etc/maven/settings.xml,具体修改方法参考:http://dreamlikes.cn/archives/584,因为编译mesos要用到maven安装很多jar包。
编译安装mesos
参考https://mesos.apache.org/gettingstarted/的Downloading Mesos部分下载源代码,以及Building Mesos (Posix)部分编译与安装mesos。
整个编译过程耗时很长,需做好心理准备,中途任何报错或者卡住都请强制退出,重新执行命令,不要干等。
配置启动脚本
创建/root/mesos目录,创建master1-3和agent1一共4个子目录,用于作为mesos的运行目录。
|
1 2 3 4 5 6 7 8 9 10 |
[root@localhost mesos]# pwd /root/mesos [root@localhost mesos]# ll 总用量 8 drwxr-xr-x. 6 root root 62 2月 5 09:45 agent1 drwxrwxr-x. 4 root root 39 2月 5 05:46 master1 drwxrwxr-x. 4 root root 39 2月 5 05:49 master2 drwxrwxr-x. 4 root root 39 2月 5 05:54 master3 -rwxrw-r--. 1 root root 296 2月 5 09:43 start_agent.sh -rwxrw-r--. 1 root root 757 2月 5 09:19 start_master.sh |
mesos-mater
之后编写srtart_master.sh,它启动包含3个master实例的高可用master集群:
|
1 2 3 4 5 6 7 |
[root@localhost mesos]# cat start_master.sh #!/bin/bash HOSTNAME=172.18.9.71 nohup mesos-master --advertise_ip=$HOSTNAME --hostname=$HOSTNAME --port=5050 --quorum=2 --work_dir=/root/mesos/master1/ --zk=zk://localhost:2181,localhost:2182,localhost:2183/mesos/master --log_dir=/root/mesos/master1/log/ >/dev/null 2>&1 & nohup mesos-master --advertise_ip=$HOSTNAME --hostname=$HOSTNAME --port=5051 --quorum=2 --work_dir=/root/mesos/master2/ --zk=zk://localhost:2181,localhost:2182,localhost:2183/mesos/master --log_dir=/root/mesos/master2/log/ >/dev/null 2>&1 & nohup mesos-master --advertise_ip=$HOSTNAME --hostname=$HOSTNAME --port=5052 --quorum=2 --work_dir=/root/mesos/master3/ --zk=zk://localhost:2181,localhost:2182,localhost:2183/mesos/master --log_dir=/root/mesos/master3/log/ >/dev/null 2>&1 & |
其中HOSTNAME=部分的IP需要修改为你虚拟机的网卡IP,参数均为必填,否则无法正常工作,各个命令行参数解释如下:
- advertise_ip:影响master在zk中保存的IP名称,会影响其他从zk中获取master地址的模块。
- hostname:一方面影响master在zk中保存的host名称,会影响其他从zk中获取master地址的模块;另外会影响mesos webui的http jsonp调用地址,必须修改才能正常访问webui。
- port:master的对外服务地址,因为在一台虚拟机配置了3个master实例,因此需要区分端口
- quorum:我们配置了3个master,mesos-master用zk选出leader负责集群调度,而集群状态持久化是通过replica log在多个master之间同步的,master内部直接实现paxos选举算法来选leader负责replica log的写入,因此mesos-master当前需要明确告知master集群的”大多数”是2,这也是为什么master一定要部署3台而不是2台,这是为了满足pasox算法硬性要求(足够产生大多数,从而选举出leader)。
- zk:master使用zk选主,只有leader master才能进行集群调度。(注意调度的leader和replica log的leader是2个不同目的的选主,实现方式也不同)
- work_dir:工作目录,会存储数据(主要是replica log记录集群的状态信息)。
- log_dir:日志目录
现在启动master,但是当前集群还没有启动agent,我们可以通过mesos master的webui访问集群状态:
|
1 |
[root@localhost mesos]# sh start_master.sh |
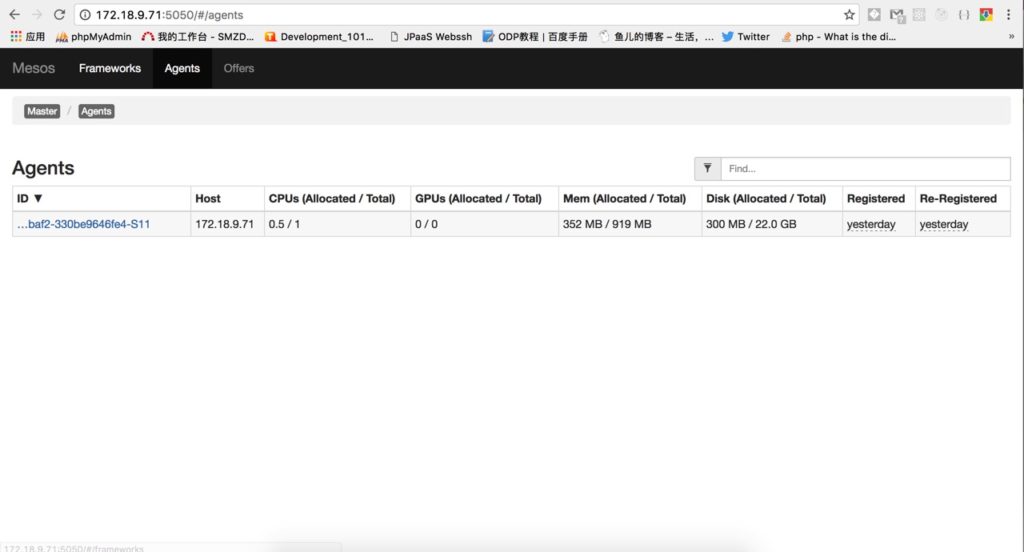
打开浏览器访问虚拟机中的mesos-master,http://虚拟机IP:5050,可以看到下面这样的图片,正常你应该看到0条agent记录(我截图时已经把agent跑起来了):
mesos-agent
很多配置项和master是通用的,别忘了配置HOSTNAME:
|
1 2 3 4 5 |
[root@localhost mesos]# cat start_agent.sh #!/bin/bash HOSTNAME=172.18.9.71 nohup mesos-agent --advertise_ip=$HOSTNAME --hostname=$HOSTNAME --port=5060 --work_dir=/root/mesos/agent1/ --master=zk://localhost:2181,localhost:2182,localhost:2183/mesos/master --log_dir=/root/mesos/agent1/log/ --containerizers=mesos,docker >/dev/null 2>&1 & |
- advertise_ip和hostname:依旧是给其他模块看的,如果登记错误别人是无法访问到agent的,必须配置。
- port:mesos-agent的服务端口。
- work_dir:工作目录,存储各类数据。
- master:mesos-master在zk上的地址,agent从zk获取master地址并连接过去进行后续交互。
- log_dir:日志存储路径。
- containerizers:配置agent支持mesos原生namespace+cgroup隔离以及直接使用docker进行资源隔离两种方式。
现在启动agent,你将会和我一样在上面图片中看到一个agent,说明master已经发现了agent:
|
1 |
[root@localhost mesos]# sh start_agent.sh |
注意:一台服务器只能启动一个agent,否则多个agent会将资源重复计算,比如原本1个cpu的机器启动2个agent会认为总资源有2个cpu,这是不行的。
相关文档
建议看一下这个mesos架构相关的介绍,另外还有官方对架构的介绍,上面的启动参数都可以在官方看到介绍,可以自己研究研究。
marathon
mesos集群提供资源管理能力,但是需要应用者自己开发framework对接到mesos上,才能将资源利用起来。
理解mesos很重要,简单的来看mesos像是一个分布式操作系统,mesos-master是内核,而mesos-agent是分布式的cpu+mem+disk硬件资源池,每个agent上面可以跑若干的任务可以看做是进程。
mesos上开发framework需要包含scheduler和executor两部分,mesos本身不提供scheduler,但是提供原生的2个通用executor:一个是基于linux namespace/cgroup实现资源隔离的mesos-executor,一个是基于docker实现资源隔离的mesos-docker-executor。无论你向mesos提交什么任务,mesos都会将它们放入一个资源隔离的容器中执行,因此通常我们只需要编写scheduler负责发起任务即可,具体任务执行则通过mesos-agent内置的executor就可以完成,任务即可以是shell命令,也可以是一个docker容器。
marathon项目就是这样一个scheduler,它和mesos交互完成任务(app)的部署与扩容,并且当任务宕机它能够快速的启动新的任务进行补充,用户只需要通过web界面操作即可满足绝大多数需求。
下载marathon
它是scala编写的,属于jvm系语言,不需要编译,下载方式参考:https://mesosphere.github.io/marathon/docs/。
不过官方的域名在国内被墙无法解析,可以用下面这个命令直接访问IP完成下载:
|
1 |
curl http://54.192.151.40/marathon/v1.3.5/marathon-1.3.5.tgz -H "Host:downloads.mesosphere.com" -O |
配置启动脚本
为了实现marathon scheduler的高可用,我们需要让marathon部署2个以上,它们也是通过zk选主的。
拷贝2份marathon如下:
|
1 2 3 4 5 6 7 8 |
[root@localhost marathon]# pwd /root/marathon [root@localhost marathon]# ll 总用量 4 drwxr-xr-x. 6 root root 109 2月 5 09:35 marathon1 drwxr-xr-x. 6 root root 109 2月 5 09:37 marathon2 drwxr-xr-x. 2 root root 22 2月 5 12:52 marathon-lb -rwxr--r--. 1 root root 500 2月 5 09:39 start_all.sh |
编辑start_all.sh启动脚本:
|
1 2 3 4 5 6 |
[root@localhost marathon]# cat start_all.sh #!/bin/bash HOSTNAME=172.18.9.71 nohup /root/marathon/marathon1/bin/start --hostname=$HOSTNAME --http_port=8080 --master zk://localhost:2181,localhost:2182,localhost:2183/mesos/master --zk zk://localhost:2181,localhost:2182,localhost:2183/marathon >/dev/null 2>&1 & nohup /root/marathon/marathon2/bin/start --hostname=$HOSTNAME --http_port=8081 --master zk://localhost:2181,localhost:2182,localhost:2183/mesos/master --zk zk://localhost:2181,localhost:2182,localhost:2183/marathon >/dev/null 2>&1 & |
别忘记改HOSTNAME为虚拟机的网卡IP,各个参数如下:
- hostname:别人可以路由到自己的host,和mesos-master/mesos-agent一样重要,必须配置。
- http_port:对外服务地址,主要是用于访问web界面。
- master:marathon scheduler需要去zk中找到mesos-master在哪个地址,连接上去才能工作。
- zk:marathon本身也是多实例高可用,需要基于zk选举出一个leader来负责工作。
启动marathon:
|
1 |
[root@localhost marathon]# sh start_all.sh |
现在可以访问marathon的web界面,浏览器打开:http://虚拟机IP:8080即可:
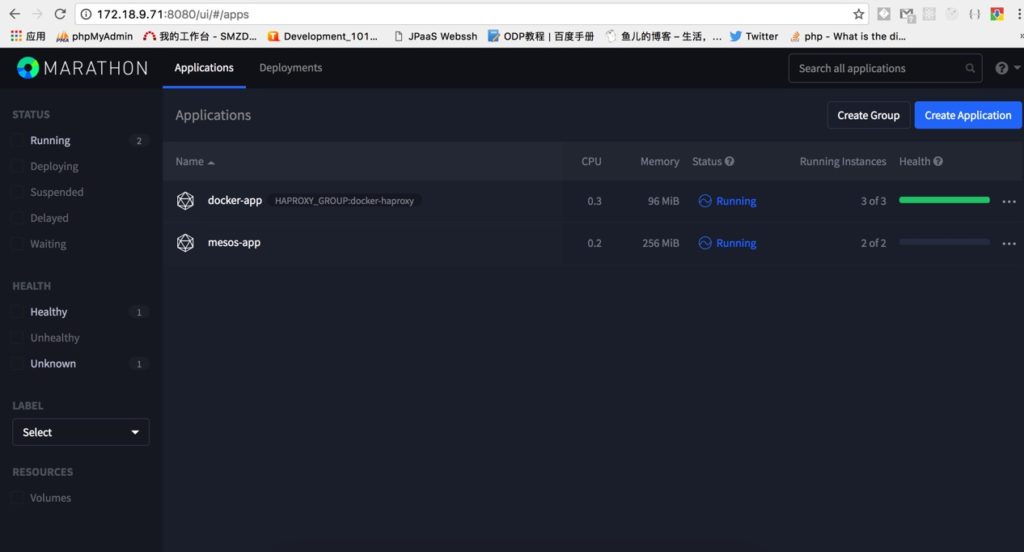
正如图中看到的那样,接下来我要创建这2个app,一个基于mesos的namespace/cgroup资源隔离机制,一个基于docker的资源隔离机制,分别看一下marathon+mesos大概是怎么工作的。
部署mesos-containerizer
这种任务在mesos-agent那里会启动mesos-executor,它又会启动mesos-containerizer用于虚拟化一个容器环境执行我们的任务。
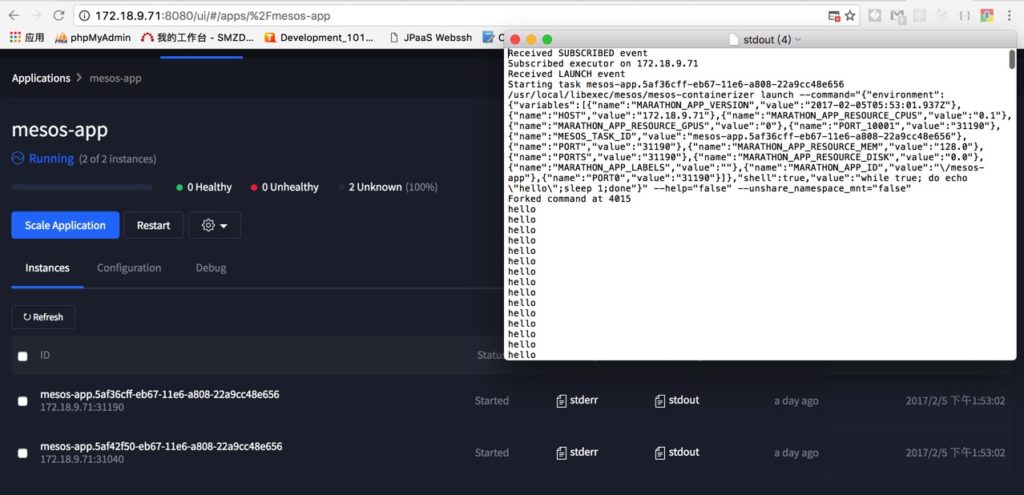
下面我通过配置一个死循环的shell命令,提交给marathon来创建app实例,叫做mesos-app:
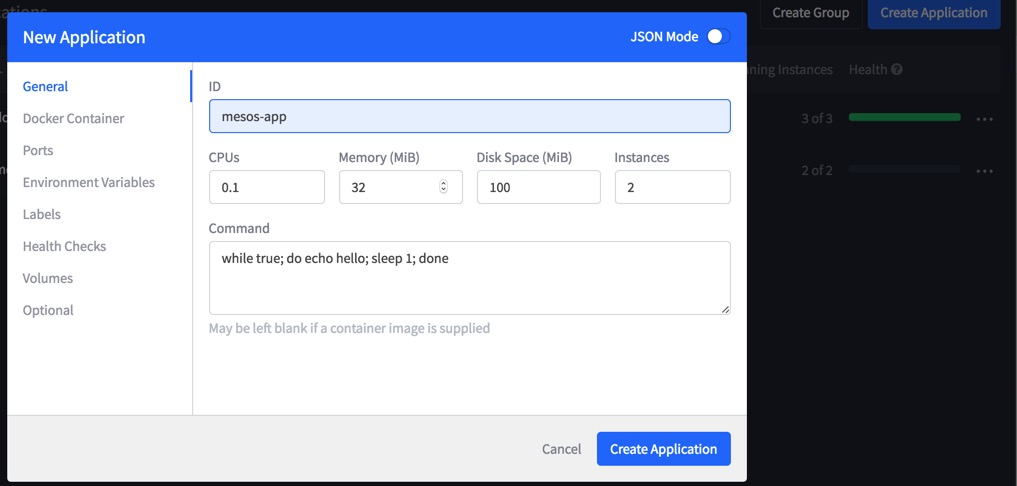
我们为每个实例分配了0.1个cpu,32M内存,100M磁盘,共生成2个实例。
接下来,mesos容器很快被启动了2个实例,并且可以通过查看log看到打印出hello:
我们也可以方便的通过scale Application按钮扩容:
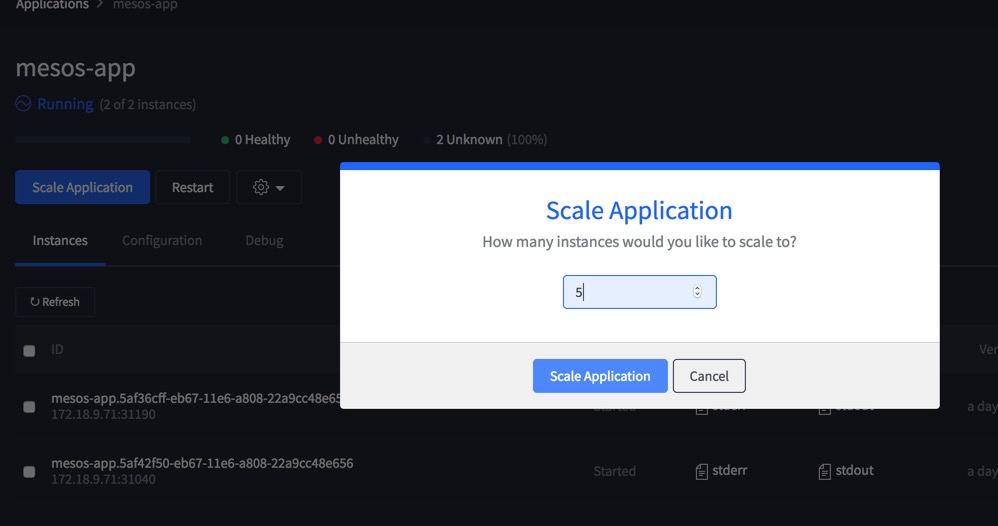
这里有2点要注意:
- 一个是marathon会保证总是有N个实例在运行,因此如果你传的shell命令是执行完立即退出的话,你会发现app的实例不停的在启动和关停。
- 另外,由于我们的shell命令没有监听端口对外服务,所以我们也没有配置health check健康检查,容器虽然在running但是状态是unknown。
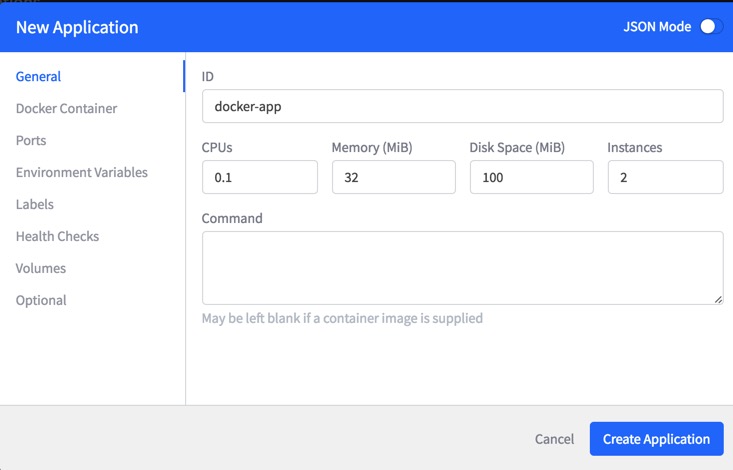
部署docker-containerizer
这种任务在mesos-agent处会被mesos-docker-executor处理,进一步将docker启动命令交给docker daemon守护进程,从而拉起一个docker容器运行。
我将直接使用docker hub上的nginx官方镜像,运行它可以创建一个可访问的nginx容器。
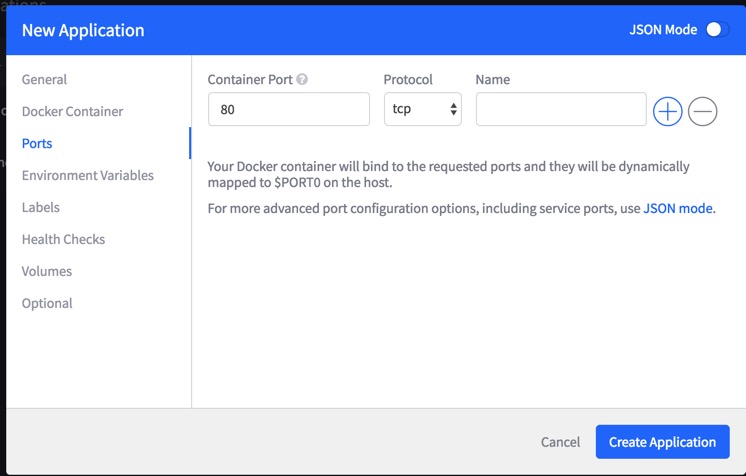
我们知道docker默认采用bridge网络模式,它不会分配公网IP并且只能和宿主机通讯,为了令外部用户可以访问到容器中的nginx,我们需要在创建app的时候指定让docker进行端口映射,将容器内的80端口映射到宿主机上的随机端口即可。
首先配置app资源:
配置docker镜像名称为nginx(来自docker hub),网络模式为bridge桥接,这样容器内端口对宿主机不可见,不会造成不同app端口冲突:
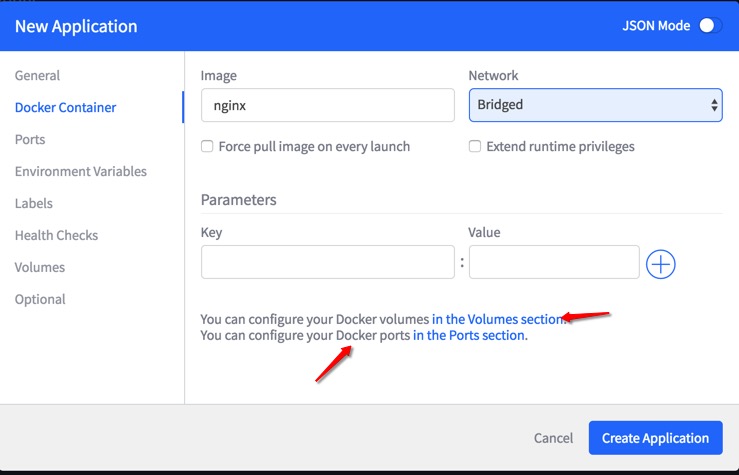
配置端口映射,将容器内的80端口映射到宿主机的随机端口。(注意下方提示:servicePort只能在JSON mode编辑,用处后面负载均衡部分会讲)
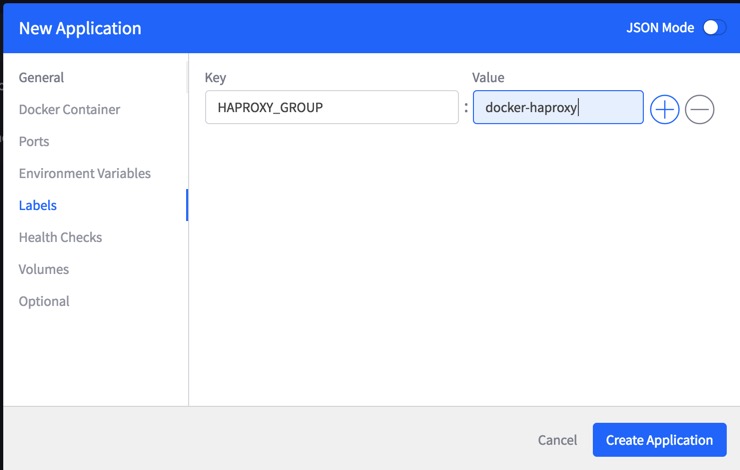
为这个任务配置一个label,这是mesos本身支持的参数,也是为后面做负载均衡用的。
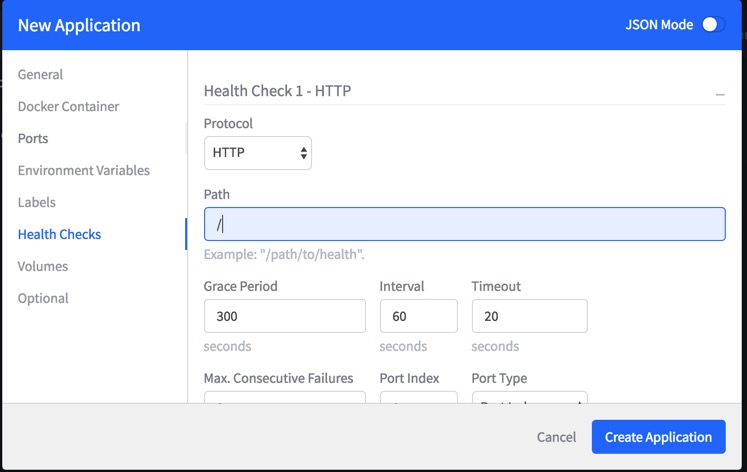
配置健康检查,定期检查80端口的http服务:
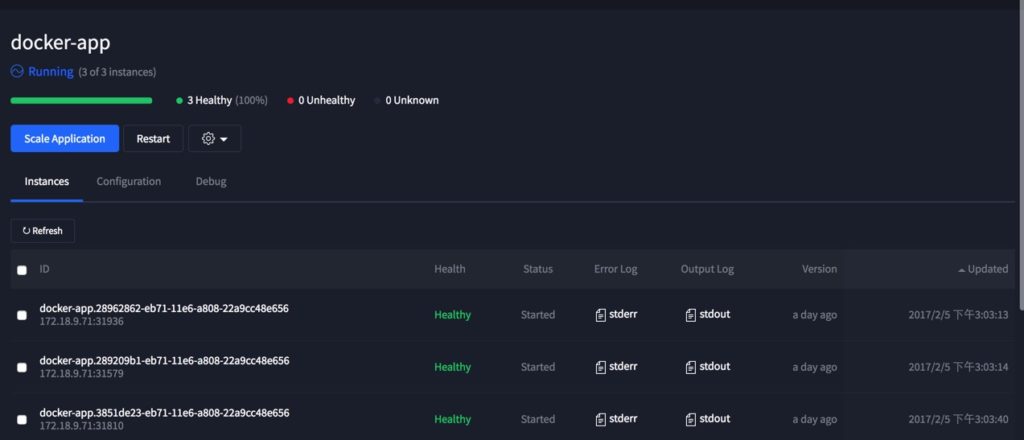
点击创建应用,可以看到实例均以启动,并且处于健康状态:
具体看一下marathon提交给mesos框架的task配置:
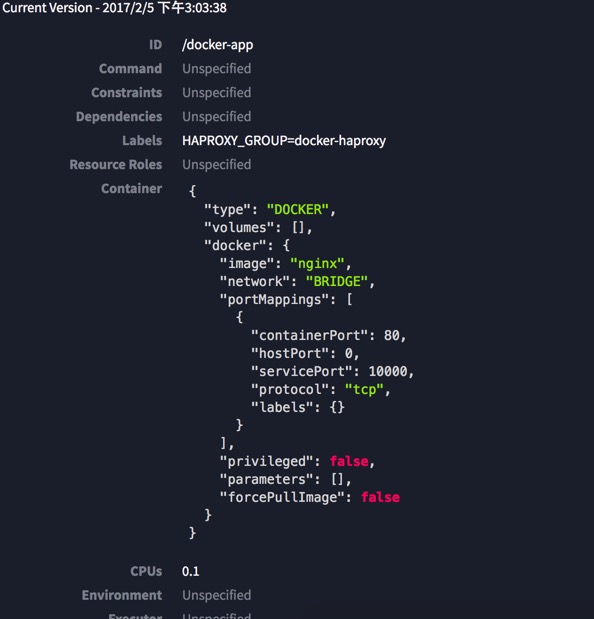
选项的含义如下:
- labels:是我们给任务(task)分配的标签,HAPROXY_GROUP用于后续做负载均衡用。
- type:容器类型是docker
- image:docker的镜像是nginx
- network:采用bridge网络模式
- portMappings:端口映射,将容器内的containerPort=80映射到宿主机的hostPort=0,也就是宿主机的随机端口。
- servicePort:用于后续负载均衡用的haproxy监听服务端口,这里启动的容器并不会去使用这个端口,仅仅是将该信息传递给mesos而已。
运行原理
|
1 2 3 4 5 6 7 8 9 |
[root@localhost marathon]# ps aux|grep executor root 3992 0.0 3.2 209688 61448 ? Ss 13:53 0:00 mesos-containerizer launch --command={"arguments":["mesos-executor","--launcher_dir=\/usr\/local\/libexec\/mesos"],"shell":false,"value":"\/usr\/local\/libexec\/mesos\/mesos-executor"} --environment={"HOST":"172.18.9.71","LIBPROCESS_PORT":"0","MARATHON_APP_ID":"\/mesos-app","MARATHON_APP_LABELS":"","MARATHON_APP_RESOURCE_CPUS":"0.1","MARATHON_APP_RESOURCE_DISK":"0.0","MARATHON_APP_RESOURCE_GPUS":"0","MARATHON_APP_RESOURCE_MEM":"128.0","MARATHON_APP_VERSION":"2017-02-05T05:53:01.937Z","MESOS_AGENT_ENDPOINT":"172.18.9.71:5060","MESOS_CHECKPOINT":"1","MESOS_DIRECTORY":"\/root\/mesos\/agent1\/slaves\/101b0995-9a63-40fe-baf2-330be9646fe4-S11\/frameworks\/0b5532ac-6b06-4231-9c73-35ea41fae403-0000\/executors\/mesos-app.5af42f50-eb67-11e6-a808-22a9cc48e656\/runs\/f37c1bee-6560-4a43-ba8a-5ab16e603037","MESOS_EXECUTOR_ID":"mesos-app.5af42f50-eb67-11e6-a808-22a9cc48e656","MESOS_EXECUTOR_SHUTDOWN_GRACE_PERIOD":"5secs","MESOS_FRAMEWORK_ID":"0b5532ac-6b06-4231-9c73-35ea41fae403-0000","MESOS_HTTP_COMMAND_EXECUTOR":"0","MESOS_NATIVE_JAVA_LIBRARY":"\/usr\/local\/lib\/libmesos-1.1.0.so","MESOS_NATIVE_LIBRARY":"\/usr\/local\/lib\/libmesos-1.1.0.so","MESOS_RECOVERY_TIMEOUT":"15mins","MESOS_SANDBOX":"\/root\/mesos\/agent1\/slaves\/101b0995-9a63-40fe-baf2-330be9646fe4-S11\/frameworks\/0b5532ac-6b06-4231-9c73-35ea41fae403-0000\/executors\/mesos-app.5af42f50-eb67-11e6-a808-22a9cc48e656\/runs\/f37c1bee-6560-4a43-ba8a-5ab16e603037","MESOS_SLAVE_ID":"101b0995-9a63-40fe-baf2-330be9646fe4-S11","MESOS_SLAVE_PID":"slave(1)@172.18.9.71:5060","MESOS_SUBSCRIPTION_BACKOFF_MAX":"2secs","MESOS_TASK_ID":"mesos-app.5af42f50-eb67-11e6-a808-22a9cc48e656","PATH":"\/usr\/local\/sbin:\/usr\/local\/bin:\/usr\/sbin:\/usr\/bin:\/sbin:\/bin","PORT":"31040","PORT0":"31040","PORTS":"31040","PORT_10001":"31040"} --help=false --pipe_read=22 --pipe_write=23 --pre_exec_commands=[] --runtime_directory=/var/run/mesos/containers/f37c1bee-6560-4a43-ba8a-5ab16e603037 --unshare_namespace_mnt=false --user=root --working_directory=/root/mesos/agent1/slaves/101b0995-9a63-40fe-baf2-330be9646fe4-S11/frameworks/0b5532ac-6b06-4231-9c73-35ea41fae403-0000/executors/mesos-app.5af42f50-eb67-11e6-a808-22a9cc48e656/runs/f37c1bee-6560-4a43-ba8a-5ab16e603037 root 3993 0.0 3.2 209688 61448 ? Ss 13:53 0:00 mesos-containerizer launch --command={"arguments":["mesos-executor","--launcher_dir=\/usr\/local\/libexec\/mesos"],"shell":false,"value":"\/usr\/local\/libexec\/mesos\/mesos-executor"} --environment={"HOST":"172.18.9.71","LIBPROCESS_PORT":"0","MARATHON_APP_ID":"\/mesos-app","MARATHON_APP_LABELS":"","MARATHON_APP_RESOURCE_CPUS":"0.1","MARATHON_APP_RESOURCE_DISK":"0.0","MARATHON_APP_RESOURCE_GPUS":"0","MARATHON_APP_RESOURCE_MEM":"128.0","MARATHON_APP_VERSION":"2017-02-05T05:53:01.937Z","MESOS_AGENT_ENDPOINT":"172.18.9.71:5060","MESOS_CHECKPOINT":"1","MESOS_DIRECTORY":"\/root\/mesos\/agent1\/slaves\/101b0995-9a63-40fe-baf2-330be9646fe4-S11\/frameworks\/0b5532ac-6b06-4231-9c73-35ea41fae403-0000\/executors\/mesos-app.5af36cff-eb67-11e6-a808-22a9cc48e656\/runs\/f4ac679f-61ef-4869-86e9-01c3fab11303","MESOS_EXECUTOR_ID":"mesos-app.5af36cff-eb67-11e6-a808-22a9cc48e656","MESOS_EXECUTOR_SHUTDOWN_GRACE_PERIOD":"5secs","MESOS_FRAMEWORK_ID":"0b5532ac-6b06-4231-9c73-35ea41fae403-0000","MESOS_HTTP_COMMAND_EXECUTOR":"0","MESOS_NATIVE_JAVA_LIBRARY":"\/usr\/local\/lib\/libmesos-1.1.0.so","MESOS_NATIVE_LIBRARY":"\/usr\/local\/lib\/libmesos-1.1.0.so","MESOS_RECOVERY_TIMEOUT":"15mins","MESOS_SANDBOX":"\/root\/mesos\/agent1\/slaves\/101b0995-9a63-40fe-baf2-330be9646fe4-S11\/frameworks\/0b5532ac-6b06-4231-9c73-35ea41fae403-0000\/executors\/mesos-app.5af36cff-eb67-11e6-a808-22a9cc48e656\/runs\/f4ac679f-61ef-4869-86e9-01c3fab11303","MESOS_SLAVE_ID":"101b0995-9a63-40fe-baf2-330be9646fe4-S11","MESOS_SLAVE_PID":"slave(1)@172.18.9.71:5060","MESOS_SUBSCRIPTION_BACKOFF_MAX":"2secs","MESOS_TASK_ID":"mesos-app.5af36cff-eb67-11e6-a808-22a9cc48e656","PATH":"\/usr\/local\/sbin:\/usr\/local\/bin:\/usr\/sbin:\/usr\/bin:\/sbin:\/bin","PORT":"31190","PORT0":"31190","PORTS":"31190","PORT_10001":"31190"} --help=false --pipe_read=22 --pipe_write=23 --pre_exec_commands=[] --runtime_directory=/var/run/mesos/containers/f4ac679f-61ef-4869-86e9-01c3fab11303 --unshare_namespace_mnt=false --user=root --working_directory=/root/mesos/agent1/slaves/101b0995-9a63-40fe-baf2-330be9646fe4-S11/frameworks/0b5532ac-6b06-4231-9c73-35ea41fae403-0000/executors/mesos-app.5af36cff-eb67-11e6-a808-22a9cc48e656/runs/f4ac679f-61ef-4869-86e9-01c3fab11303 root 3994 0.7 3.5 808964 66228 ? Sl 13:53 1:22 mesos-executor --launcher_dir=/usr/local/libexec/mesos root 3995 0.7 3.4 808964 65824 ? Sl 13:53 1:21 mesos-executor --launcher_dir=/usr/local/libexec/mesos root 21857 0.6 3.5 809084 66532 ? Ssl 15:03 0:46 mesos-docker-executor --container=mesos-101b0995-9a63-40fe-baf2-330be9646fe4-S11.d06cd16a-5fb1-441f-ab31-1164df5b769b --docker=docker --docker_socket=/var/run/docker.sock --help=false --initialize_driver_logging=true --launcher_dir=/usr/local/libexec/mesos --logbufsecs=0 --logging_level=INFO --mapped_directory=/mnt/mesos/sandbox --quiet=false --sandbox_directory=/root/mesos/agent1/slaves/101b0995-9a63-40fe-baf2-330be9646fe4-S11/frameworks/0b5532ac-6b06-4231-9c73-35ea41fae403-0000/executors/docker-app.28962862-eb71-11e6-a808-22a9cc48e656/runs/d06cd16a-5fb1-441f-ab31-1164df5b769b --stop_timeout=0ns root 21858 0.6 3.5 809084 66344 ? Ssl 15:03 0:45 mesos-docker-executor --container=mesos-101b0995-9a63-40fe-baf2-330be9646fe4-S11.05af88db-5dbb-4e14-9b66-117825381032 --docker=docker --docker_socket=/var/run/docker.sock --help=false --initialize_driver_logging=true --launcher_dir=/usr/local/libexec/mesos --logbufsecs=0 --logging_level=INFO --mapped_directory=/mnt/mesos/sandbox --quiet=false --sandbox_directory=/root/mesos/agent1/slaves/101b0995-9a63-40fe-baf2-330be9646fe4-S11/frameworks/0b5532ac-6b06-4231-9c73-35ea41fae403-0000/executors/docker-app.289209b1-eb71-11e6-a808-22a9cc48e656/runs/05af88db-5dbb-4e14-9b66-117825381032 --stop_timeout=0ns root 21883 0.0 0.5 118404 10400 ? Sl 15:03 0:00 docker -H unix:///var/run/docker.sock run --cpu-shares 102 --memory 33554432 -e MARATHON_APP_VERSION=2017-02-05T07:03:12.485Z -e HOST=172.18.9.71 -e MARATHON_APP_LABEL_HAPROXY_GROUP=docker-haproxy -e MARATHON_APP_RESOURCE_CPUS=0.1 -e MARATHON_APP_RESOURCE_GPUS=0 -e MARATHON_APP_DOCKER_IMAGE=nginx -e MESOS_TASK_ID=docker-app.289209b1-eb71-11e6-a808-22a9cc48e656 -e PORT=31579 -e MARATHON_APP_RESOURCE_MEM=32.0 -e PORTS=31579 -e MARATHON_APP_RESOURCE_DISK=100.0 -e PORT_80=31579 -e MARATHON_APP_LABELS=HAPROXY_GROUP -e MARATHON_APP_ID=/docker-app -e PORT0=31579 -e MESOS_SANDBOX=/mnt/mesos/sandbox -e MESOS_CONTAINER_NAME=mesos-101b0995-9a63-40fe-baf2-330be9646fe4-S11.05af88db-5dbb-4e14-9b66-117825381032 -v /root/mesos/agent1/slaves/101b0995-9a63-40fe-baf2-330be9646fe4-S11/frameworks/0b5532ac-6b06-4231-9c73-35ea41fae403-0000/executors/docker-app.289209b1-eb71-11e6-a808-22a9cc48e656/runs/05af88db-5dbb-4e14-9b66-117825381032:/mnt/mesos/sandbox --net bridge -p 31579:80/tcp --name mesos-101b0995-9a63-40fe-baf2-330be9646fe4-S11.05af88db-5dbb-4e14-9b66-117825381032 nginx root 21892 0.0 0.5 118404 10100 ? Sl 15:03 0:00 docker -H unix:///var/run/docker.sock run --cpu-shares 102 --memory 33554432 -e MARATHON_APP_VERSION=2017-02-05T07:03:12.485Z -e HOST=172.18.9.71 -e MARATHON_APP_LABEL_HAPROXY_GROUP=docker-haproxy -e MARATHON_APP_RESOURCE_CPUS=0.1 -e MARATHON_APP_RESOURCE_GPUS=0 -e MARATHON_APP_DOCKER_IMAGE=nginx -e MESOS_TASK_ID=docker-app.28962862-eb71-11e6-a808-22a9cc48e656 -e PORT=31936 -e MARATHON_APP_RESOURCE_MEM=32.0 -e PORTS=31936 -e MARATHON_APP_RESOURCE_DISK=100.0 -e PORT_80=31936 -e MARATHON_APP_LABELS=HAPROXY_GROUP -e MARATHON_APP_ID=/docker-app -e PORT0=31936 -e MESOS_SANDBOX=/mnt/mesos/sandbox -e MESOS_CONTAINER_NAME=mesos-101b0995-9a63-40fe-baf2-330be9646fe4-S11.d06cd16a-5fb1-441f-ab31-1164df5b769b -v /root/mesos/agent1/slaves/101b0995-9a63-40fe-baf2-330be9646fe4-S11/frameworks/0b5532ac-6b06-4231-9c73-35ea41fae403-0000/executors/docker-app.28962862-eb71-11e6-a808-22a9cc48e656/runs/d06cd16a-5fb1-441f-ab31-1164df5b769b:/mnt/mesos/sandbox --net bridge -p 31936:80/tcp --name mesos-101b0995-9a63-40fe-baf2-330be9646fe4-S11.d06cd16a-5fb1-441f-ab31-1164df5b769b nginx |
ps aux看一下宿主机内的进程:一共有2个mesos-executor,它们启动了2个mesos-containerizer容器环境,执行我们的shell命令。另外有2个mesos-docker-executor,它们启动了2个docker容器环境,执行我们的nginx镜像。
再看一下docker ps,会发现mesos的确在docker daemon中启动了2个容器,并且完成了端口的映射,具体映射到宿主机的端口也可以看到:
|
1 2 3 4 |
[root@localhost marathon]# docker ps CONTAINER ID IMAGE COMMAND CREATED STATUS PORTS NAMES e2b55b4c39ab nginx "nginx -g 'daemon ..." 2 hours ago Up 2 hours 443/tcp, 0.0.0.0:31936->80/tcp mesos-101b0995-9a63-40fe-baf2-330be9646fe4-S11.d06cd16a-5fb1-441f-ab31-1164df5b769b ebc1dd151ce7 nginx "nginx -g 'daemon ..." 2 hours ago Up 2 hours 443/tcp, 0.0.0.0:31579->80/tcp mesos-101b0995-9a63-40fe-baf2-330be9646fe4-S11.05af88db-5dbb-4e14-9b66-117825381032 |
访问容器中的Nginx
分别访问2个容器,可以正常访问服务:
|
1 2 3 4 5 6 7 8 9 10 11 12 13 14 15 16 17 18 19 20 21 22 23 24 25 26 27 28 29 30 31 32 33 34 35 36 37 38 39 40 41 42 43 44 45 46 47 48 49 50 51 52 |
[root@localhost marathon]# curl 172.18.9.71:31936 <!DOCTYPE html> <html> <head> <title>Welcome to nginx!</title> <style> body { width: 35em; margin: 0 auto; font-family: Tahoma, Verdana, Arial, sans-serif; } </style> </head> <body> <h1>Welcome to nginx!</h1> <p>If you see this page, the nginx web server is successfully installed and working. Further configuration is required.</p> <p>For online documentation and support please refer to <a href="http://nginx.org/">nginx.org</a>.<br/> Commercial support is available at <a href="http://nginx.com/">nginx.com</a>.</p> <p><em>Thank you for using nginx.</em></p> </body> </html> [root@localhost marathon]# curl 172.18.9.71:31579 <!DOCTYPE html> <html> <head> <title>Welcome to nginx!</title> <style> body { width: 35em; margin: 0 auto; font-family: Tahoma, Verdana, Arial, sans-serif; } </style> </head> <body> <h1>Welcome to nginx!</h1> <p>If you see this page, the nginx web server is successfully installed and working. Further configuration is required.</p> <p>For online documentation and support please refer to <a href="http://nginx.org/">nginx.org</a>.<br/> Commercial support is available at <a href="http://nginx.com/">nginx.com</a>.</p> <p><em>Thank you for using nginx.</em></p> </body> </html> |
问题来了:
- 端口是随机映射到宿主机的,那么外部用户就不知道该用哪个端口才能访问到nginx。
- marathon启动容器是根据资源选择agent的,那么容器不一定部署在哪个ip上。
这些问题的解决就需要用到下面的marathon-lb负载均衡了。
marathon-lb
这是为marathon框架提供负载均衡的中间件,它监听marathon上的容器启停事件变化,利用haproxy将请求转发到对应的容器实例中,每当容器发生变化(比如退出或者新增),它就会重新生成haproxy配置并触发haproxy reload。
以往传统物理机部署,我们做反向代理也会常用到haproxy,并且配合keepalived实现主备防止单点haproxy故障,在marathon里也是一样的道理,只不过haproxy被marathon-lb包装了一下,可以在这里了解。
另外一种mesos的负载均衡手段是基于mesos-dns的,原理与marathon-lb类似,只不过它是直接监听mesos的事件并生成DNS记录,提供标准DNS协议的查询接口罢了,可以在这里了解,这里就不做试验了。
配置启动脚本
|
1 2 3 4 5 6 |
[root@localhost marathon-lb]# pwd /root/marathon/marathon-lb [root@localhost marathon-lb]# cat start.sh #!/bin/bash docker run -d -e PORTS=9090 --net=host mesosphere/marathon-lb sse --group docker-haproxy --marathon http://172.18.9.71:8080 http://172.18.9.71:8081 |
创建/root/marathon/marathon-lb目录并编写start.sh脚本,官方建议我们在docker中运行mesosphere/marathon-lb这个docker镜像,这样我们就不用去安装marathon-lb需要的运行环境了(很麻烦,要haproxy,要python等等…)。
- -e:传递一个环境变量到docker容器中,这个PORTS=9090会被haproxy获取并监听,后面访问该端口可以查看haproxy的状态和实时配置文件。
- –net:此前docker容器都使用的bridge模式,这样容器的IP是虚拟IP,并且PORT在宿主机不可见,只能通过端口映射访问。而这里指定host模式,容器不会为网络设置namespace隔离,因此容器将共享宿主机的IP,并且PORT在宿主机也可以直接访问。这样做的目的很简单,我们的haproxy希望外部用户直接访问,就像传统部署在物理机上一样,用镜像的目的只是简化环境安装而已,所以选择了host网络模式。
- –group:指定组,也就是之前在marathon配置的labels:HAPROXY_GROUP=docker-haproxy,这样启动的marathon-lb将只反向代理配置了该label的容器,其他没有配置group或者配置了其他group的app是无法通过该haproxy访问的,也就是说:该marathon-lb只监听与维护关于这个group的haproxy配置。
- –marathon:指定marathon服务的地址列表,marathon-lb会连接marathon用于监听event bus,也就是各类容器变动事件,从而动态的修改haproxy配置,实时热加载变化。
通过marathon-lb访问docker-app
首先,我们可以访问http://虚拟机IP:9090/_haproxy_getconfig来查看当前的haproxy配置,可以观察到如下信息:
|
1 2 3 4 5 6 7 8 9 10 11 12 13 14 15 |
frontend docker-app_10000 bind *:10000 mode http use_backend docker-app_10000 backend docker-app_10000 balance roundrobin mode http option forwardfor http-request set-header X-Forwarded-Port %[dst_port] http-request add-header X-Forwarded-Proto https if { ssl_fc } option httpchk GET / timeout check 20s server 172_18_9_71_31579 172.18.9.71:31579 check inter 60s fall 4 server 172_18_9_71_31936 172.18.9.71:31936 check inter 60s fall 4 |
最下方2个server其实就是我们2个nginx服务的可访问地址,当前haproxy对外监听10000端口,反向代理到172.18.9.71:31579和172.18.9.71:31936两个地址。那么10000端口是怎么得来的呢?回到之前的图片中,观察marathon配置中的servicePort项,它用于告知marathon-lb的haproxy应该用哪个端口对外服务,默认marathon会为每个app分配独一无二的servicePort配置,确保不同app间不会重复,当然我们也可以在创建app时显式编辑json文件配置这个端口的值。
现在我们访问marathon-lb:
|
1 2 3 4 5 6 7 8 9 10 11 12 13 14 15 16 17 18 19 20 21 22 23 24 25 26 |
[root@localhost marathon-lb]# curl localhost:10000 <!DOCTYPE html> <html> <head> <title>Welcome to nginx!</title> <style> body { width: 35em; margin: 0 auto; font-family: Tahoma, Verdana, Arial, sans-serif; } </style> </head> <body> <h1>Welcome to nginx!</h1> <p>If you see this page, the nginx web server is successfully installed and working. Further configuration is required.</p> <p>For online documentation and support please refer to <a href="http://nginx.org/">nginx.org</a>.<br/> Commercial support is available at <a href="http://nginx.com/">nginx.com</a>.</p> <p><em>Thank you for using nginx.</em></p> </body> </html> |
成功访问到nginx!为了验证marathon-lb的服务发现能力,我们直接在docker命令行杀死其中一个容器并再次查看haproxy配置:
|
1 2 3 4 5 6 7 |
[root@localhost marathon-lb]# docker ps CONTAINER ID IMAGE COMMAND CREATED STATUS PORTS NAMES 25cc93b6f6c8 mesosphere/marathon-lb "tini -g -- /marat..." 6 minutes ago Up 6 minutes modest_leakey e2b55b4c39ab nginx "nginx -g 'daemon ..." 2 hours ago Up 2 hours 443/tcp, 0.0.0.0:31936->80/tcp mesos-101b0995-9a63-40fe-baf2-330be9646fe4-S11.d06cd16a-5fb1-441f-ab31-1164df5b769b ebc1dd151ce7 nginx "nginx -g 'daemon ..." 2 hours ago Up 2 hours 443/tcp, 0.0.0.0:31579->80/tcp mesos-101b0995-9a63-40fe-baf2-330be9646fe4-S11.05af88db-5dbb-4e14-9b66-117825381032 [root@localhost marathon-lb]# docker kill e2b55b4c39ab e2b55b4c39ab |
杀死后,我们访问haproxy的9090端口再次查看最新的配置文件:
|
1 2 3 4 5 6 7 8 9 10 11 12 13 14 |
frontend docker-app_10000 bind *:10000 mode http use_backend docker-app_10000 backend docker-app_10000 balance roundrobin mode http option forwardfor http-request set-header X-Forwarded-Port %[dst_port] http-request add-header X-Forwarded-Proto https if { ssl_fc } option httpchk GET / timeout check 20s server 172_18_9_71_31579 172.18.9.71:31579 check inter 60s fall 4 |
不出意料,只剩下一个server了,服务仍旧可以正常访问。用不了几秒,marathon发现了该容器已死亡,会再次拉起一个容器补充上来:
|
1 2 3 4 5 |
[root@localhost marathon-lb]# docker ps CONTAINER ID IMAGE COMMAND CREATED STATUS PORTS NAMES 43cf92bf7e24 nginx "nginx -g 'daemon ..." About a minute ago Up About a minute 443/tcp, 0.0.0.0:31054->80/tcp mesos-101b0995-9a63-40fe-baf2-330be9646fe4-S11.ca2b472e-e9c1-4249-8b58-e6e56ebc8191 25cc93b6f6c8 mesosphere/marathon-lb "tini -g -- /marat..." 8 minutes ago Up 8 minutes modest_leakey ebc1dd151ce7 nginx "nginx -g 'daemon ..." 2 hours ago Up 2 hours 443/tcp, 0.0.0.0:31579->80/tcp mesos-101b0995-9a63-40fe-baf2-330be9646fe4-S11.05af88db-5dbb-4e14-9b66-117825381032 |
并查看haproxy最新配置:
|
1 2 3 4 5 6 7 8 9 10 |
backend docker-app_10000 balance roundrobin mode http option forwardfor http-request set-header X-Forwarded-Port %[dst_port] http-request add-header X-Forwarded-Proto https if { ssl_fc } option httpchk GET / timeout check 20s server 172_18_9_71_31054 172.18.9.71:31054 check inter 60s fall 4 server 172_18_9_71_31579 172.18.9.71:31579 check inter 60s fall 4 |
对比发现,31579端口的nginx始终正常服务,而新启动的nginx容器的映射端口已经随机变化为了31054。
关于marathon-lb还有另外一个用法值得一提,就是haproxy支持http vhost,需要通过给app配置label:HAPROXY_{n}_VHOST。其中将n替换为vhost,就可以通过haproxy的80/443标准端口访问到具体的app了,和Nginx vhost没有区别,具体参考:这里,当然servicePort仍旧可以访问到app。
后话
之前百度也一直在用类似的PAAS平台,对比marathon来看的话,发现原生marathon主要缺少几个功能:
- 发布升级代码:百度内部支持持续集成,每次可以指定发布的项目版本,新老容器会平滑过渡。而在marathon里只有一个重启app的功能,必须通过某个手段告知容器本次应该拉取哪份代码,或者干脆重新打包镜像发布到docker hub再重启容器(创建app时需要勾选每次强制拉取镜像)。
- 不支持回滚:上线有bug想回滚到前一个代码版本,同样也不支持。
- 跨机房部署:百度内部支持多机房,可以配置每个机房启动几个实例。在marathon里要实现这个功能,一方面要通过为mesos-agent配置attribute来标记所属机房,另外一方面需要使用marathon的constraints功能来控制app只能运行在符合指定attribute的mesos-agent上。为了实现多机房部署,我们需要为每个机房创建一个app,并通过为app配置constraints的方式来实现。
当然,这些问题可能都已经有解决方案了,只是我还没有去扩展研究。另外,后续我会单独把基于marathon+mesos的分布式定时任务chronos部署一下。
补充阅读
为了更深刻的理解mesos+marathon,除了亲自部署和探索整个过程外,也建议读一下这篇博客:点这里,它主要讲解了mesos的框架执行原理和关系,有利于更好的理解系统。
祝玩的愉快。
如果文章帮助您解决了工作难题,您可以帮我点击屏幕上的任意广告,或者赞助少量费用来支持我的持续创作,谢谢~

公司准备上Mesos和Marathon,近期正在学习,这篇文章是我看到的讲解最清晰、思路最连贯、语言最通顺的中文文章,非常感谢博主的无私分享,谢谢!
客气!
1