kong入门
kong是基于openresty开发的一套代理框架,openrestry是对nginx支持了lua扩展。
如果你使用openresty的理由主要是为了编程实现流量(策略)转发,那么应该考虑用kong,而不是基于openresty做网络转发,为什么这么说?
- kong利用openresty的能力,在请求的各个生命期注册了钩子函数,以便实现kong框架能力。
- kong自己实现了一套路由与转发逻辑,我们大多数情况只需要向kong添加配置规则即可灵活控制转发。
- kong在自己的路由和转发环节支持了插件机制,允许我们实现插件回调函数来扩展kong的能力,比如限速。
下面我们简单的体验一下kong的基本使用,尽量涉及到kong生命期的几个核心概念。
安装postgresql
kong的路由和转发配置均需要保存在postgresql数据库中,以便实现kong集群节点间配置共享。
这里下载对应操作系统的RPM源文件:https://yum.postgresql.org/repopackages.php,然后rpm -i安装一下。
在Centos中,执行如下命令安装postgresql 10版本+(kong要求9.5+):
|
1 |
yum install -y postgresql10-server |
初始化数据库:
|
1 |
/usr/pgsql-10/bin/postgresql-10-setup initdb |
修改数据库登录方式(很重要),替换下面3行的最后一列为trust:
|
1 2 3 4 5 6 7 8 |
vim /var/lib/pgsql/10/data/pg_hba.conf # "local" is for Unix domain socket connections only local all all trust # IPv4 local connections: host all all 127.0.0.1/32 trust # IPv6 local connections: host all all ::1/128 trust |
启动数据库:
|
1 2 |
systemctl start postgresql-10 systemctl enable postgresql-10 |
登录postgresql(这个linux用户相当于pg的超级管理员):
|
1 2 |
su postgres psql |
创建kong用户与数据库:
|
1 |
postgres=# CREATE USER kong; CREATE DATABASE kong OWNER kong; |
验证可以登录:
|
1 |
psql --username=kong -h127.0.0.1 |
安装Kong
参考官方:https://konghq.com/install/,选择对应平台,利用apt/yum安装即可。
安装后,cp一份配置文件:
|
1 |
cp /etc/kong/kong.conf.default /etc/kong/kong.conf |
观察一下配置文件中的默认database配置:
|
1 2 3 4 5 6 7 8 9 10 11 12 13 |
#database = postgres # Determines which of PostgreSQL or Cassandra # this node will use as its datastore. # Accepted values are `postgres`, # `cassandra`, and `off`. #pg_host = 127.0.0.1 # Host of the Postgres server. #pg_port = 5432 # Port of the Postgres server. #pg_timeout = 5000 # Defines the timeout (in ms), for connecting, # reading and writing. #pg_user = kong # Postgres user. #pg_password = # Postgres user's password. #pg_database = kong # The database name to connect to. |
不需要对上述配置文件修改,采用默认值即可。
下面的命令,kong会把存储配置的数据表建立出来:
|
1 |
kong migrations bootstrap -c /etc/kong/kong.conf |
观察kong数据库
先看看数据库的样貌,切回postgres用户,psql超级管理员登录:
|
1 2 |
su postgres psql |
列出数据库的命令是\l:
|
1 2 3 4 5 6 7 8 9 10 |
kong=# \l List of databases Name | Owner | Encoding | Collate | Ctype | Access privileges -----------+----------+----------+-------------+-------------+----------------------- kong | kong | UTF8 | en_US.UTF-8 | en_US.UTF-8 | postgres | postgres | UTF8 | en_US.UTF-8 | en_US.UTF-8 | template0 | postgres | UTF8 | en_US.UTF-8 | en_US.UTF-8 | =c/postgres + | | | | | postgres=CTc/postgres template1 | postgres | UTF8 | en_US.UTF-8 | en_US.UTF-8 | =c/postgres + | | | | | postgres=CTc/postgres |
进入数据库的命令是\c kong:
|
1 2 |
kong-# \c kong You are now connected to database "kong" as user "postgres". |
列出所有table的命令是:
|
1 2 3 4 5 6 7 8 9 10 11 12 13 14 15 16 17 18 19 20 21 22 23 24 25 26 27 28 29 30 31 32 |
kong-# \d List of relations Schema | Name | Type | Owner --------+-------------------------------+-------+------- public | acls | table | kong public | apis | table | kong public | basicauth_credentials | table | kong public | ca_certificates | table | kong public | certificates | table | kong public | cluster_ca | table | kong public | cluster_events | table | kong public | consumers | table | kong public | hmacauth_credentials | table | kong public | jwt_secrets | table | kong public | keyauth_credentials | table | kong public | locks | table | kong public | oauth2_authorization_codes | table | kong public | oauth2_credentials | table | kong public | oauth2_tokens | table | kong public | plugins | table | kong public | ratelimiting_metrics | table | kong public | response_ratelimiting_metrics | table | kong public | routes | table | kong public | schema_meta | table | kong public | services | table | kong public | sessions | table | kong public | snis | table | kong public | tags | table | kong public | targets | table | kong public | ttls | table | kong public | upstreams | table | kong (27 rows) |
查看具体一个表结构(这里以路由规则为例,对应apis表):
|
1 2 3 4 5 6 7 8 9 10 11 12 13 14 15 16 17 18 19 20 21 22 23 24 |
kong-# \d apis Table "public.apis" Column | Type | Collation | Nullable | Default --------------------------+--------------------------+-----------+----------+--------------------------------------------- id | uuid | | not null | created_at | timestamp with time zone | | | timezone('UTC'::text, CURRENT_TIMESTAMP(3)) name | text | | | upstream_url | text | | | preserve_host | boolean | | not null | retries | smallint | | | 5 https_only | boolean | | | http_if_terminated | boolean | | | hosts | text | | | uris | text | | | methods | text | | | strip_uri | boolean | | | upstream_connect_timeout | integer | | | upstream_send_timeout | integer | | | upstream_read_timeout | integer | | | Indexes: "apis_pkey" PRIMARY KEY, btree (id) "apis_name_key" UNIQUE CONSTRAINT, btree (name) Referenced by: TABLE "plugins" CONSTRAINT "plugins_api_id_fkey" FOREIGN KEY (api_id) REFERENCES apis(id) ON DELETE CASCADE |
启动kong
|
1 2 |
[root@localhost ~]# kong start -c /etc/kong/kong.conf Kong started |
它默认监听2套端口:
- 代理流量的:HTTP 8000和HTTPS 8443。
- 配置kong的:HTTP 8001和HTTPS 8444。
观察kong配置文件
kong是基于openresty的框架,openresty是基于nginx的框架。
kong的nginx配置文件特别简单,主要逻辑都被实现在lua里:
|
1 2 3 4 5 6 7 8 9 10 11 12 13 14 15 16 17 |
[root@localhost ~]# cat /usr/local/kong/nginx.conf worker_processes auto; daemon on; pid pids/nginx.pid; error_log logs/error.log notice; worker_rlimit_nofile 1000000; events { worker_connections 1000000; multi_accept on; } http { include 'nginx-kong.conf'; } |
重点在于nginx-kong.conf的这一部分:
|
1 2 3 4 5 6 7 8 9 10 11 12 13 14 15 16 17 18 19 20 21 22 23 24 25 26 27 28 29 30 31 32 33 34 35 36 37 38 39 40 41 42 43 44 45 46 47 48 49 50 51 52 53 54 55 56 57 58 59 60 61 62 63 64 65 66 67 68 69 70 |
init_by_lua_block { Kong = require 'kong' Kong.init() } init_worker_by_lua_block { Kong.init_worker() } upstream kong_upstream { server 0.0.0.1; balancer_by_lua_block { Kong.balancer() } # injected nginx_http_upstream_* directives keepalive_timeout 60s; keepalive_requests 100; keepalive 60; } server { server_name kong; listen 0.0.0.0:8000; listen 0.0.0.0:8443 ssl http2; error_page 400 404 408 411 412 413 414 417 494 /kong_error_handler; error_page 500 502 503 504 /kong_error_handler; access_log logs/access.log; error_log logs/error.log notice; client_body_buffer_size 8k; ssl_certificate /usr/local/kong/ssl/kong-default.crt; ssl_certificate_key /usr/local/kong/ssl/kong-default.key; ssl_certificate_by_lua_block { Kong.ssl_certificate() } ssl_session_cache shared:SSL:10m; ssl_session_timeout 10m; ssl_prefer_server_ciphers on; ssl_ciphers ECDHE-ECDSA-AES256-GCM-SHA384:ECDHE-RSA-AES256-GCM-SHA384:ECDHE-ECDSA-CHACHA20-POLY1305:ECDHE-RSA-CHACHA20-POLY1305:ECDHE-ECDSA-AES128-GCM-SHA256:ECDHE-RSA-AES128-GCM-SHA256:ECDHE-ECDSA-AES256-SHA384:ECDHE-RSA-AES256-SHA384:ECDHE-ECDSA-AES128-SHA256:ECDHE-RSA-AES128-SHA256; real_ip_header X-Real-IP; real_ip_recursive off; # injected nginx_proxy_* directives rewrite_by_lua_block { Kong.rewrite() } access_by_lua_block { Kong.access() } header_filter_by_lua_block { Kong.header_filter() } body_filter_by_lua_block { Kong.body_filter() } log_by_lua_block { Kong.log() } |
从配置上来看:
- 只有一个upstream处理向后端转发的逻辑,里面也是跑的kong的lua逻辑
- 只有一个server处理所有请求,kong通过注册请求生命期的多个钩子函数完成请求自定义处理。
这些生命期钩子其实都是openresty暴露出来的,一张图就可以快速了解请求的处理流程:
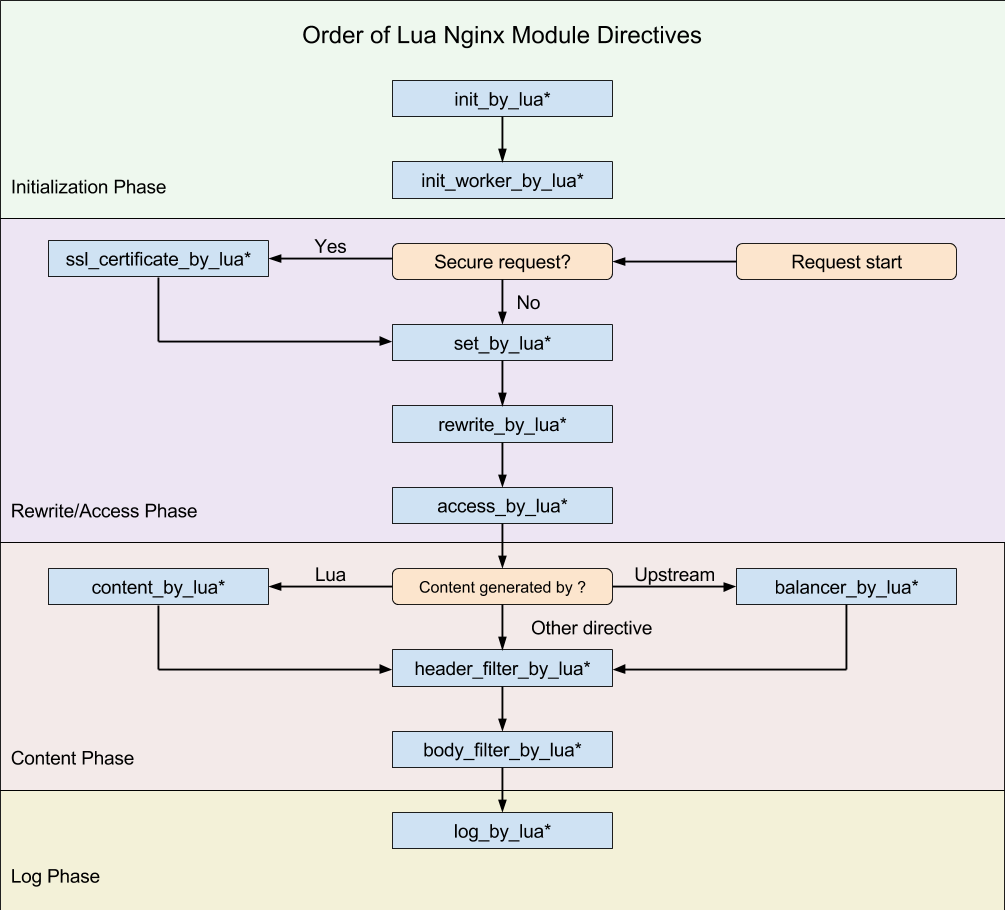
kong通过注册钩子函数,接管了请求处理的各个阶段。
向kong注册api
kong是代理服务器,所以首先需要定义1个upstream,也就是被调用的上游服务器。
下面我们就做一套代理流量到http://yuerblog.cc的配置。
创建upstream
upstream代表一组上游服务器,首先给它指定一个name创建出来,再向里面添加具体后端列表:
|
1 |
curl -X POST http://kong:8001/upstreams \ --data "name=yuerblog-upstream" |
添加target到upstream
给upstream添加1个具体后端实例,称为1个target:
|
1 |
curl -X POST http://localhost:8001/upstreams/yuerblog-upstream/targets --data 'target=yuerblog.cc' |
当然可以添加多个target用作负载均衡,同时upstream也可以设置对target的健康检查策略,为了简单就不展开演示了。
创建service指向upstream
kong设计了一个叫做service的概念,用于表示后端被调用服务。
它可以关联到1个upstream做负载均衡,也可以直接关联到1个host,这里我们当然用upstream做演示了。
|
1 |
curl -X POST http://localhost:8001/services/ --data 'name=yuerblog-service' --data 'host=yuerblog-upstream' |
这个service有自己的name,通过host指向upstream对象。
当流量进入service的时候,其实就是upstream在负责具体工作。
创建route
route就是路由,用于对请求URL进行匹配,每个route会关联1个转发请求的service。
route支持针对请求的header/host等进行匹配,我们只演示一个简单的按host匹配即可:
|
1 |
curl -X POST http://localhost:8001/services/yuerblog-service/routes/ --data 'hosts[]=yuerblog-kong.cc' |
当kong收到Host为yuerblog-kong.cc域名的HTTP请求的时候,就会匹配该route规则,并且流量交给yuerblog-service这个service做转发处理。
测试
|
1 2 3 4 5 6 7 8 |
curl http://127.0.0.1:8000/ -H'Host:yuerblog-kong.cc' <html> <head><title>301 Moved Permanently</title></head> <body bgcolor="white"> <center><h1>301 Moved Permanently</h1></center> <hr><center>nginx/1.14.0</center> </body> </html> |
请求kong的8000流量端口,指定Host为yuerblog-kong.cc,将命中route,流量经过service -> upstream -> target发往真实上游服务器。
我们成功得到了应答。
本文就到这里,我们已经体验了Kong的几个关键核心对象,具体每一种对象还有哪些配置项可以参考文档慢慢丰富。
下一篇博客我会单独写一下如何应用官方提供的限速plugin,实现接口限速保护。
相关链接
如果文章帮助您解决了工作难题,您可以帮我点击屏幕上的任意广告,或者赞助少量费用来支持我的持续创作,谢谢~